
 .
.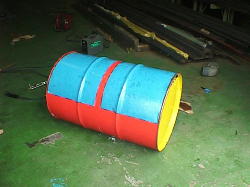
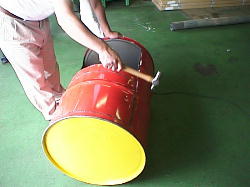
Photo 5. Finished making two openings
Photo 6. Kiln covers were cut from the second drum can and placed over the openings of the first drum can. Covers were cut at 120 degree arc.
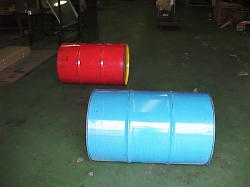
Prepare two new drum cans. This is the basic kiln. One kiln is made from two drum cans. This is for temperatures less than 900 degrees C, and the kiln is not reinforced. See �gMORE DETAILED PHOTOS�h regarding reinforcing the kiln.
--How to make the carbonization furnace part--
The carbonization furnace is constructed from the first drum can.
Lay the drum can on its side. (The part with the large oil cap should be toward the top, and the part with the smaller air-release cap should be toward the bottom.)
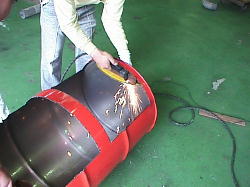
Cut two openings along the top with a plasma cutter or disc grinder (See photos 4 and 5). Leave 4 cm from each side, and 8 cm at the middle. The openings should form a 90 degree arc in relation to the circumference.
Turn the drum can to the opposite side, and cut two slits in the parts that jut out. These will be for expelling water and reflux liquid.
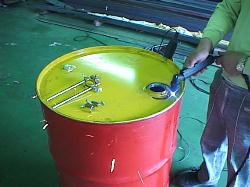
If the drum can is made from die cast aluminum, remove the die cast aluminum cap. On the part of the drum with the large oil cap, put a 10 to 15 cm square steel sheet (2 m thickness) against the inside surface, and fix in place with steel screws or by welding. (This step is not necessary if the cap is made from steel, but make sure to remove the rubber gasket. Then close the cap on the can again.)
Around the small air-release cap, make a 9 cm diameter hole. This will become the exhaust vent (see photos 2 and 3). {The chimney will be attached here.}
On the opposite side of the drum can, cut a window (see photo 7). The window is cut horizontally at a height of 9 �p from the top inside surface. Cut a piece of 3 - 4 cm angle iron, about 34 cm in length (should be the length of the window). Insert this angle iron onto the edge of the window so the angle iron goes toward the inside of the can, and weld the bottom portion of the angle iron onto the drum can.
--How to make the firewood chamber part--
The second drum can is used to make the firewood chamber and covers for the openings on the carbonization furnace.
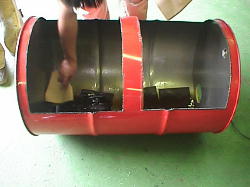
The drum can is cut into two parts.
The drum is cut so that one side is half the drum length + 1 cm and the other side is half the drum length - 1 cm.
The longer half (half + 1 cm) is used to make the firewood chamber.
The shorter half (half - 1 cm) is used to make 3 covers for the openings on the carbonization furnace. Three covers are cut at a 120 degree angle in relation to the circumference (Each cover forms a 120 arc). One cover is a spare.
On the firewood chamber section, using a disc grinder or other cutting device, make 3-cm-long cuts at 3 cm intervals around the circumference, and bend these 3 cm x 3 cm sections inwards at about 15 degree angles.
Next, on the firewood chamber, the opening for the firewood is constructed.
For the firewood opening, from the outside bottom of the can, cut an opening 18 cm width x 19�p height. Make a frame around the opening by welding together 3 sheets of iron plate (20 cm x 20 cm x 3 or more tons). This frame is fitted around the 18 cm x 19 cm opening of the firewood chamber. Using a disc grinder, two slits are cut in the drum can for the iron plates.
Insert the iron plate frame into the slits on the firewood chamber at the opening for the firewood. Then, weld the frame onto the drum can from the outside.
When the 20 cm x 20 cm iron plate frame is fitted around the firewood opening (18 cm width x 19 cm height), there is 1 cm edge remaining on the top and both sides of the firewood opening, on the inside of the iron plate frame. Pound this 1 cm edge outward and weld to the iron plate frame.
Weld the frame at the slits on the drum can also.
--Connecting the carbonization chamber and the firewood chamber--
Next, the carbonization chamber and firewood chamber part will be connected together. Align the two chambers so that the top of the iron plate frame is parallel with the high temperature exhaust vent.
The firewood chamber is inserted into the carbonization furnace. Then, the 3 cm x 3 cm sections that were bent inward are pushed back out with a rod to their original form, along the inside surface of the carbonization furnace. The outer perimeter of the chambers are welded together from the outside.
In particular, weld the high temperature exhaust vent area carefully.
Even though there may be holes, they will become covered and sealed with soil, so small holes will not be a problem.
--Attaching the exhaust adapter--
Attach a 10 cm diameter adapter (length 8-10 cm) at the exhaust port. This can be made with a stainless steel sheet, or from a 10 cm diameter stainless steel pipe.
The chimney will be attached to the adapter.
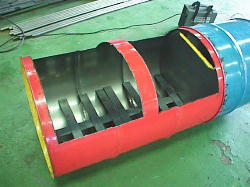
--How to make grates--
Make 2 grates. Prepare 8 metal planks (3-4 ton thickness, 6 cm x 44 cm) and 2 planks of 6 cm x 42 cm.
Lay out one 42 cm plank on a level surface, and put 44 cm planks at both ends. Align the centers of the 44 cm planks with the center of the 42 cm plank. Then, carefully add the remaining two 44 cm planks. Weld the planks together in the structure of a backbone. Construct the second grate in the same way.
Note:
Regarding the width of the planks for the grate, in general, 6 cm wide planks are sufficient.
Wood or bamboo shrinks about 20 - 30% during the carbonization process.
If the material to be carbonized has a high rate of shrinkage, then use 7 cm wide planks for the front
and rear planks of the grate.Example, the plank widths would be as follows from front to rear of the carbonization chamber: 7 cm, 6 cm, 6 cm, 6 cm, 6 cm, 6 cm, 6 cm, 7cm
--Reinforcement angle irons (Necessary for high temperatures) --
Along both sides of the carbonization chamber material-loading openings, weld 89 cm angle iron, 10 cm below the edge of the openings. Also, weld three more pieces of angle iron (10 cm, 20 cm and 10 cm pieces) for extra support. {There are ridges (or rings) that jut out on the sides and the top and bottom rim of the drum can. Attach the 89 cm long angle iron on these areas that jut out. Then, add the short pieces of angle iron (10 cm, 20 cm, 10 cm) to fill in the gap between the long angle irons and the drum can. Attach the 20 cm piece at the center of the 89 cm angle iron, and the 10 cm pieces near both the ends of the 89 cm angle iron.}
{At high temperature, the drum can becomes pliable. These angle irons prevent the drum can from collapsing at high temperature under the pressure of the surrounding soil.}
-----------------
* Necessary tool--
For cutting the drum cans, you can attach a cutter-grinder onto a disc-grinder. If a plasma cutter is not available, cuts can be made easily with a disc-grinder. Electric welder, scriber, pliers, and hammer are also needed.
The kiln can be made in a half day to one day.
Make sure the kiln does not get wet, since it will rust. Even if you bury the kiln in soil, it will last a long time as long as the kiln does not get wet.
Kiln life-span: If the drum can thickness is less than 1.2 mm, the kiln can be used more than 30 times at temperatures less than 1000 deg C. The life-span depends on the way the kiln is used and whether high temperature is used. If the drum can thickness is 1.6 mm, it can be used 50 times. However, these are just estimates and not guaranteed.
The intellectual property rights for this kiln have been given to Meiko Eelectronics Company, Ltd. Individuals may make this kiln, but it cannot be made and sold for business.
We are planning to publish how to make this kiln at some time in the future.
----------------------------------------
--Setting up the charcoal-making kiln--
When choosing the location for the charcoal kiln, consider the placement of the chimney and the firewood opening. After the location for the kiln is decided, the ground is leveled, so that an ALC concrete insulation board (more than 37 mm thickness) can be laid flat.
A space of about 2.5 m x 1.5 m is necessary for each kiln.
Next, we consider insulation of the charcoal-making kiln from the ground.
In Japan, lightweight fired concrete boards (ALC, Autoclaved Lightweight Concrete) is laid on the ground and used as insulation. {In other countries, if ALC boards are not available, use bricks or stones.}
A concrete board is laid flat on the ground, and the kiln is put on top of the concrete. {If ALC is not available, dig a shallow ditch in the soil and pack with bricks or stones to make a level surface for the kiln. Then, add a layer of soil 20 cm thickness for insulation.}
Soil is packed around the kiln to fix it in place.
If ALC boards are available, place them 10 cm away from the kiln, forming a rectangular walled enclosure around the kiln. Put stakes at 30 cm intervals to support the concrete walls.
If ALC boards are not available, bricks (or stones) are placed at the front of the drum can and sides to make walls 60 cm in height. About 15-20 cm space is necessary between the bricks and the kiln. Stakes are placed at 30 intervals to support the bricks or stones.
Next, insulation soil is put between all the enclosures and the oven.
Dry soil is mixed with dry chaff, straw, charcoal ash or other dry biomass at a 50-50 ratio (50% soil - 50% biomass). This soil mixture is packed around the drum can to about 10 cm below the top material-loading openings on the carbonization furnace. Pack down the soil firmly. The soil acts as insulation.
As for the firewood chamber side, 2 bricks and metal sheets, or insulation concrete are set up to form a wall, and soil or insulation are placed between the wall and the firewood chamber.
At the firewood opening, place two concrete blocks in front of the iron plate frame. Set a half sheet of ALC concrete on top of the concrete blocks and fix in place with pipes or other material.
Attach a T-shaped pipe to the exhaust adapter. In the bottom portion of the T-shaped pipe, fill with small size stones. This acts to remove the moisture that first comes out of the bamboo or wood. If you are not concerned about the moisture, an L-shaped pipe is fine. A 10 cm diameter chimney is attached to the pipe. On both sides of the chimney, stack three concrete blocks. Prepare an 18 liter can (or 5 gallon can). Remove the top and bottom of the can so it forms a rectangular cylinder, and put the can on top of the blocks, with the chimney passing through the center of the can. Put the mixture of soil and biomass between the ALC concrete and the kiln, and it is ready to use. Fill the 18 liter can with soil to the top of the can.
{Note: In Japan, a T-shaped pipe for chimney is standard size. It is the same as the upper part of the L shaped pipe, but on the lower part, there is a cover. Remove the cover and use the pipe. The length of the lower part is about 70 % of the length of the upper part. Use this pipe, and make a hole in the bottom ALC board. In the lower part of the pipe, put in small stones. In the initial part of the charcoal making process, high temperature air comes in contact with the bamboo or wood, and first, a large quantity of moisture from the bamboo or wood material arises. This T-shaped pipe is used to expel the moisture from the bottom part of the chimney.}
{Note: After putting soil into the 18 liter can, 15 cm of the chimney remains above the soil. If you cover the chimney with an approximately 18 cm deep milk can, when the chimney is covered, the milk can goes into the soil and air leakage is prevented. In this way, we can cover the exit side. Further, it prevents the overall temperature of the chimney from decreasing. If the chimney is in contact with the atmosphere when collecting bamboo or wood vinegar, condensation occurs on the inside surface of the part of the chimney that is cooled. This 18 liter can prevents cooling the chimney as much as possible.}
If you are not collecting bamboo or wood vinegar, and using low temperature, prepare two 10.6 mm stainless steel pipes for the chimney (90 cm length each). If you are using high temperature, prepare four pipes for chimney (90 cm length each).
{Note: In general, in Japan, charcoal made at temperature below 800 C is called black charcoal, and charcoal with electrical conductivity property, made above 800 C is called white charcoal. This charcoal-making kiln can be used for temperatures above 900 C and below 900 C. }
Next, a chimney is set up to distill vinegar and tar.
(Earthen pipe can be used if stainless steel is not available. An earthen chimney can be made from clay. Knead the clay and make it into a pipe shape. Attach the pipe to the exhaust vent and heat from the kiln will bake and harden the clay. There will be many cracks in the pipe, but it will be satisfactory to use as a chimney.)
Prepare stainless steel pipes for separating and collecting bamboo or wood vinegar. The vertical pipe directly connected to the kiln should be 10 cm diameter. Then, additional pipes will be connected together, and the total length of the chimney should be 10 m or longer. The additional pipes should be 10.0 - 10.6 cm diameter. They are slightly larger than 10 cm in diameter to make it easy to attach or detach the chimney. If the additional pipes are the same diameter (10 cm) burnt tar build-up in the chimney might cause difficulty when detaching the chimney. (In Japan, steel pipes are 90 cm long, so about 12 pipe segments are needed.)
When the temperature reaches 70 deg C, switch the firewood completely from wood to bamboo.
When the temperature of the smoke is 85 deg C, remove the two vertical chimney pipes, and replace them with the chimney for collecting bamboo or wood vinegar. The maximum temperature for collecting the vinegar is smoke temperature of 120 deg C. After finishing collecting the vinegar, return to the vertical chimney.�@
{See more details in the section �gAbout the charcoal making method?Explanation for making bamboo charcoal�h}
To photo
----------------------
About the charcoal making method--Explanation for making bamboo charcoal
Please conduct thorough safety education.
Most children do only the work they are assigned, so please teach them how to protect themselves.
Wear gloves, safety mask, safety glasses, long-sleeved top, full-length trousers, and outer clothing that is not easily flammable. Also, be careful about the type of shoes.
Please give detailed instructions such as do not run in the charcoal-making kiln area, and do not go to areas other than the designated areas.
Especially, be careful of burn injuries (Make sure to prepare a bucket of water and keep it nearby).
Materials and tools to prepare:
Bamboo and wood to make into charcoal.
Thermometer capable of measuring up to 250 deg C. If possible, use a K-type thermometer capable of measuring up to 1200 deg C.
Bucket or milk can for collecting bamboo or wood vinegar.
To make the charcoal, firewood must be burned for about 3 hours for bamboo charcoal, and 5-6 hours for wood charcoal. When making charcoal from wood, replace the word �gbamboo�h with �gwood�h in the following instructions.
Also, prepare shovel, bucket, water for extinguishing fire, extra soil (to block the inlet of the kiln), milk can or other can {to cover the exhaust chimney at the last step of the charcoal making process; at least 18 cm deep can is good}, pH measurement instrument, and bamboo (wood) for making into charcoal. (It can be long-jointed bamboo or moso bamboo. Five years or older bamboo is even better. New bamboo breaks easily and soft charcoal results).
The bamboo must be cut to fit inside the drum can. (Cut to shorter than 80 cm lengths). Cut evenly into 40 cm lengths, as much as possible. The bamboo is hollow and has internal partitions at each joint. If you do not cut the partitions, the bamboo will burst in the kiln, so make sure to cut each joint with a metal saw, or make a hole in the bamboo, or split the bamboo lengthwise into 2 to 6 sections and remove the internal partitions. Remove the internal partitions to reduce the bulk. If you don�ft mind the noise of the internal compartments in the bamboo exploding, you can leave the partitions.
Put the bamboo inside the kiln, laying the pieces horizontally or vertically {see photo}. When packing the bamboo into the kiln, leave about a 5 cm gap at the top. Hot air will pass through this area. After packing the kiln, put the covers on the openings and put soil on top of the covers. The soil layer thickness should be 10 cm or more. Pack the soil carefully and thoroughly so that the soil is hard and air cannot enter.
Attach two pipes together vertically for the chimney. This reduces the excess air pressure.
Please use dry, easily flammable firewood.
In 3 hours, we will use 30 kg or more cedar for the firewood when making bamboo charcoal. When making charcoal from wood, prepare at least 48 kg of cedar for the firewood.�@I use cedar and American pine mill ends. The firewood should be cut into pieces 3 cm or less in diameter and 40 cm or less in length. The length of the firewood chamber is 42 cm, so if the firewood is too long, the wood will extend outside of the kiln. If the wood burns outside of the kiln, the heat will create upward air currents and heat will be drawn away from the kiln, and the temperature inside the kiln will decrease.
First, prepare to light the firewood in the firewood chamber. Light a flame on a stick of firewood and use this to light the firewood in the kiln. After the firewood in the kiln starts burning, the most important point is to not let this fire be extinguished. (Burning too much firewood is a waste of energy, so please use the firewood efficiently.)
Regarding the time required--
40 to 50 minutes after starting the fire, the temperature of the smoke from the chimney will reach more than 80 deg C. At temperatures below 80 deg, in the smoke, there is a lot of moisture and harmful substances such as methanol from the bamboo or wood (methanol formation temperature is 78.7 deg C) so the bamboo vinegar collected will not be good quality. To gain experience, please keep a record of the color of the smoke and amount of smoke. There is a close relationship between the color and temperature of the smoke. At 70 deg C, switch the firewood completely from cedar to bamboo. This is to obtain 100% bamboo vinegar.
When the temperature reaches 85 deg C, change the chimney to the chimney for fractional distillation to collect the vinegar. Bamboo or wood vinegar can be collected when the smoke temperature is 85 - 120 deg C. Above 150 deg C, substances such as tar will increase. Tar contains a carcinogenic substance.
Bamboo is also effective for making the chimney pipe for fractional distillation to collect the bamboo or wood vinegar. Bamboo is inexpensive and two long pieces can be joined together. It is aesthetically pleasing and looks nice in photographs. Split the bamboo lengthwise in half. On the bottom half, cleanly scrape out the internal partitions of the bamboo. On the top half, the internal partitions can be cut out roughly. Put the two halves of bamboo together and hold together with wire. Leave a small gap between the two pieces of bamboo so that external air can enter and cool the smoke. More vinegar can be collected this way. However, a bamboo chimney is 20% less effective than a 10 m stainless chimney.
Next, measure the pH of the vinegar. Take 30 ml of vinegar from the collection can and put it in a beaker. Insert a glass electrode into the beaker to measure the pH. The pH will be about 2.2 to 3.3.
If possible, it is better to have two or more people to make the charcoal. Then, you can take shifts to watch the fire. Otherwise, there is no time to eat meals while watching the fire in the kiln.
In making charcoal, the bamboo or wood that becomes charcoal is steamed. If the flame is made stronger, or a large quantity of air is supplied, the fire from the firewood chamber will spread to the carbonization chamber and the bamboo or wood will burn instead of becoming charcoal. Please keep in mind that with exception of the last phase, the bamboo or wood becomes charcoal by steaming. So, be careful not to blow air into the kiln. If an impatient person blows a large quantity of air into the kiln, the charcoal-making will be unsuccessful.
In the case of making charcoal for a school experiment, at 15 minute intervals, observe the smoke that comes out of the end of the chimney. Also measure the temperature of the exhaust smoke at the same time. (The internal and external chimney temperatures differ by about 20 deg C.) Make sure the liquid from the vinegar-collecting chimney does not leak, and collect the bamboo vinegar in a separate large container. Later, the vinegar can be transferred to plastic bottles. After 3 months, the liquid will separate into 3 layers. The top layer will have oil constituent. The lower layer will be tar substance. The middle layer will be good quality bamboo vinegar. If you continue to let the fire burn, after about 3 hours (for wood charcoal, it will be within 5 hours) the carbonization process will have progressed on the bamboo (or wood) inside the kiln and the bamboo will become red. At this time, the smoke coming out of the chimney will change from white to transparent blue color. The kiln temperature will be about 750 to 900 deg C at this time.
When the smoke becomes transparent blue, wait about 5 minutes, then with the soil (that you have prepared beforehand), block the entrance of the firewood chamber to less than half the size and wait another 5 minutes. Then, completely block and seal the entrance of the firewood chamber with the soil. Remove the two chimney pipe segments. Cover the exhaust chimney using a can or other type of cover and block the air to choke and extinguish the fire in the kiln. As long as possible, maintain the state of no-oxygen. Wait about 4 hours until the temperature drops to less than 200 deg C. If possible, it is good to wait until the next day.
---
With this charcoal-making kiln, I do not encourage the following absolutely, but if shortening the life-span of the kiln is acceptable, the following procedure can be done.
To achieve temperature of 1000 deg C, add two more pipes (each pipe is 90 cm length) to the chimney (total of 4 pieces), and fan a large quantity of air into the firewood chamber from the firewood opening. The top part of the charcoal will become ashes, though. When the internal temperature reaches 1000 deg C, immediately (within one minute) remove the chimney and seal the chamber to choke and extinguish the fire.
CAUTION! At the end, the temperature of the smoke rises above 800 deg C, and there is danger of burns even when wearing standard gloves. When the smoke temperature rises above 120 C, and is at a temperature where you are no longer collecting bamboo or wood vinegar, you can use regular gloves without getting burned, and change the chimney back to the original chimney that is not for collecting vinegar. When the smoke temperature increases above 120 deg C, and the original chimney is put in place again, switch to cedar for the firewood.}
{The procedure to achieve 1000 deg C temperature can be started when the smoke color becomes light violet-blue color. The chimney can be extended to four pipes after finishing collecting the bamboo or wood vinegar.
If bamboo or wood vinegar is not going to be collected, four chimney pipes can be used from the beginning.
With a chimney made from two pipes, the internal temperature difference between the front and rear sections of the carbonization chamber is less than 20 deg C. With a chimney made from four pipes, more air flows through the kiln, so the temperature difference between the front and rear sections of the chamber becomes slightly larger, but the temperature difference is less than 50 deg C. For kiln temperature of 1000 deg C, this temperature difference is only about 2% to 5% and is not a problem.}
Also, it is no problem to use 4 pipes for the chimney from the beginning.
During school class, or when there is not much time, after the kiln cools naturally for 1 hour, the charcoal can be removed quickly and sand or ashes can be shoveled in to cool quickly. In this case, wear leather gloves, protective glasses, and other protective clothing.
To details of IM-10 type. Making charcoal kiln pdf data down load page-->.IM-10SA to IM-14